.So, your Peaceglobe is done, and you want to put it in the sidebar... You are, rightly, proud of it, and can't wait until June 6th to show it...
1) First of all, you have to get your peaceglobe off your computer and onto the internet. If you haven't got blogger, it should be a similar process.
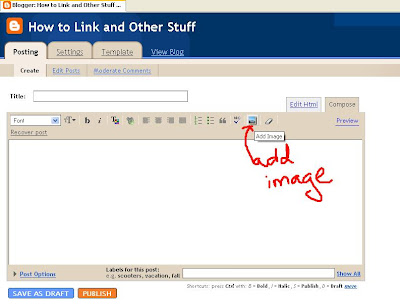
In Blogger, you have to upload the picture into a post before you can do anything else with it, so open a 'New Post' box, and click 'add image' icon (the little picture):
 2)
2) Click 'small' for image size, and 'centre' for position, then click where it says 'Browse':

3) Find your peaceglobe where you cleverly saved it so you wouldn't forget, double-click on it, or click on it then use the 'open' button of the dialogue box:
 4)
4) To make the picture a permenent file in Blogger, you then must publish this post... (don't worry, you don't have to leave it there - once you've got its location, you can then delete it, or re-save it as 'draft' for later use):
 5)
5) Next, go to your blog (you can do this in a seperate window or tab, if you find that easier):
 6)
6) Right-click on your peaceglobe picture, scroll down the list until you get to 'properties' and left-click:
 7)
7) Copy the location of the picture (an easy way is to triple-click on it):
 8)
8) Go back to the blog dashboard, and click the 'Template' tab:
 9)
9) Now, to find a good place in the sidebar to put your Peaceglobe....
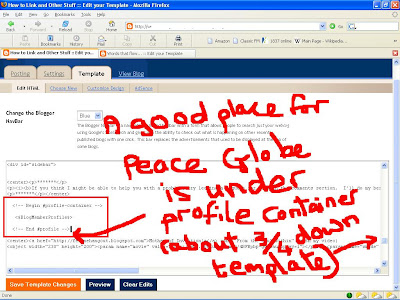
Two choices that might be popular are just beneath the profile container, or at the very top of the sidebar.
Either way, use the scroll button on the right to move to about 3/4 down the template. The sidebar is around here somewhere, so slow down until you find something that looks like this (click to enlarge)::
either...
or...
 10)
10) I usually start off with putting in paragraph code. When you use the 'open paragraph' and 'close paragraph' codeat the beginning and end of a piece of writing, or a block with writing and an image (s), then it will seperate what's within the code from whatever else is on the page. (I can't write this code here, or it will treat whatever I put between it as a paragraph, but you won't actually see the code, so look for the 'p' and '/p' within the 'v-shaped, sideways brackets):
 11)
11) Write the 'open-' and 'closed-' paragraph code, pressing 'enter' twice in between, so they are on different lines.
12) Now you are almost ready to 'paste' the Peaceglobe location you copied a little while ago. First, though, there's some more code that needs to be there (enlarge the follow picture, by clicking on it, to see the code better).
Within another set of those sideways-V brackets, you need to write
img src=""
This is giving instructions that what follows at the location you're going to put here is a picture:
 13)
13) Once you've typed in the code for an image, the next thing is to paste the location of your peaceglobe you copied at
7). Find the two "" and place the cursor in between, then paste (either right-click and choose 'paste', or press the
ctrl and
V buttons together):
 14)
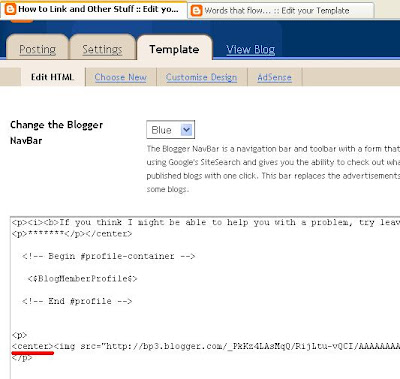
14) Now, to neaten up the picture, so it's central ( you don't have to do this step, if you want the picture to the left of the sidebar to line up with anything else you have there).
Place the word (in those sideways-v brackets)
center at one end of the line you've just written in...
...and
/center (in those same brackets) at the other end:
 15)
15) Sometimes, I'll use the open and close paragraph code, with spaces in between, to add a space between a picture or block of writing, and the other stuff in the sidebar (but it hasn't proved to be the most effective method... I'm still working on this problem):
 16)
16) Another thing you can add is some writing, maybe an explanation of the Peaceglobe picture. You can put this above or below the picture, before or after the paragraph code... depending on how you want it to look. I've written a simple explanation here - what and when:
 17)
17) Now, before saving, it's a really good idea to check what it looks like, and make sure it's up there in the sidebar where you want it to be.... use the 'preview' button at the bottom left of the template. When you've looked, use the 'back arrow' at the top of the page to return to template:
 18)
18) If everything looks OK, then comes a REALLY IMPORTANT bit (which, I have to admit, I've forgotten in the past) -
SAVE!!!!
 19)
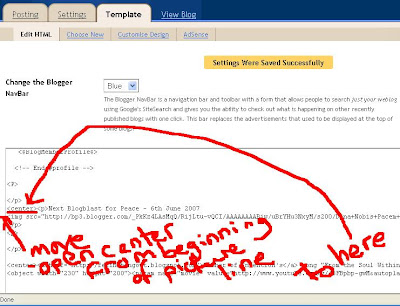
19) One thing I found wasn't to my satisfaction when I did the preview was that the picture was centred, but the writing above it wasn't, so I moved the 'center' code to before the writing:
Save again, after any changes.
So, this is what mine looked like:
 20)
20) The last thing to do is to 'disappear' the original picture you published at the beginning. This can be done in two ways:
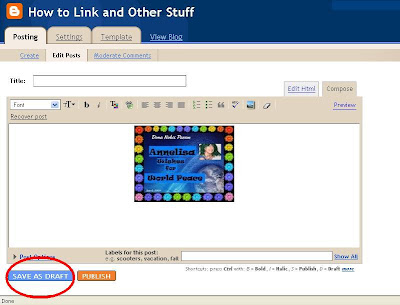
- By returning to the post, using the 'edit posts' button, and clicking 'edit' on the last post you did, the clicking 'save as draft' - this will retain the picture for future use, if you want it:
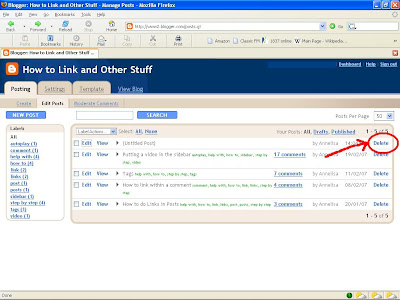
- or, if you don't foresee needing the picture again (you can always use the location address from the template if you need it, or upload it again from scratch) when you've clicked the 'edit posts' button, you could simply delete that whole post:
And that should be that (I hope) unless I've forgotten something essential... :-D
Good luck!
And...
don't forget to send Mimi a copy of your globe in an email (on her profile page), so she can add it to her globe gallery!!
.


 11) Write the 'open-' and 'closed-' paragraph code, pressing 'enter' twice in between, so they are on different lines.
 13) Once you've typed in the code for an image, the next thing is to paste the location of your peaceglobe you copied at 7). Find the two "" and place the cursor in between, then paste (either right-click and choose 'paste', or press the ctrl and V buttons together):


 16) Another thing you can add is some writing, maybe an explanation of the Peaceglobe picture. You can put this above or below the picture, before or after the paragraph code... depending on how you want it to look. I've written a simple explanation here - what and when:


 (You can also place your writing just as easily after the video code, so it appears underneath)


